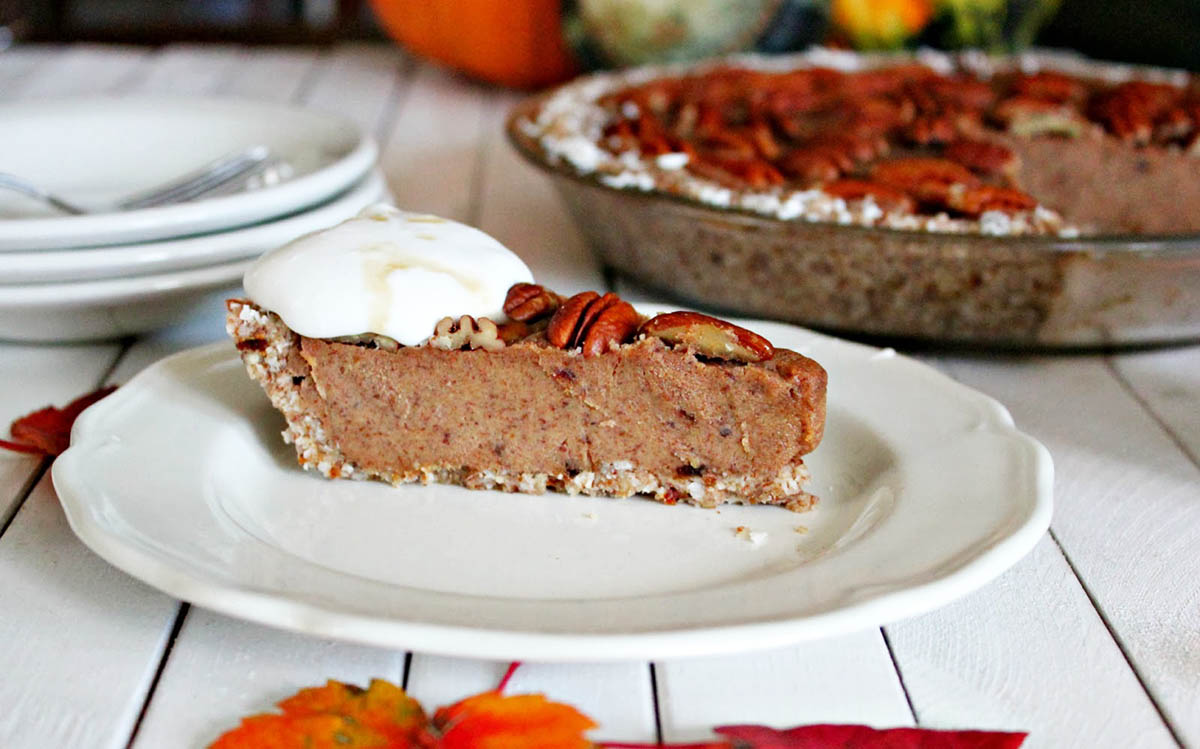
Pecan Pie with Maple Coconut Cream
Recipe: (serves 16-20) Print it Here
Crust:
1 ½ cups pecans or raw buckwheat flour (I used pecans, but think I might use buckwheat would be nice)
½ cup coconut
2 tablespoon coconut oil
¼ cup chopped dates
a pinch of sea salt
½ teaspoon vanilla
Procedure: Puree all of the ingredients together in a food processor until the mixture holds together. Press firmly into a 20 cm (8 inch) pie plate (one with a removable bottom would be best, but it isn't necessary). Be sure to cover the bottom and sides of the pie plate. Chill pie crust.
Filling:
3 cups pecans (I know, I know, so many nuts!)
1 cup chopped dates (soaked in 1 cup hot water for 30 minutes - keep the soaking water)
¼ cup and 2 tablespoon coconut oil, melted
4 tablespoon coco butter, melted
1 teaspoon cinnamon
¼ teaspoon nutmeg
1 teaspoon vanilla
½ teaspoon sea salt
*optional: zest of 1 orange (Hannah suggested this).
Procedure:
Puree the pecans until they become very fine, almost so they become the consistency of nut butter. Add the cinnamon, nutmeg, salt, and orange zest if using. Combine. Put mixture aside.
Puree the dates and water until they become a paste. Add the nut mixture and combine.
Slowly add the liquid oil. Be sure to add a little at a time while the machine is running, you dont want the mixture to split.
Poor the mixture into the pie shell and using the back of a spoon, spread it, filling all gaps (wet the spoon if the mixture begins to stick to it too much) .
Top the pie with more pecans if desired. Refrigerate to set.
To serve: it is best to slice the pie straight from the fridge when it is cold, but then let it warm up to room temperature (it will have a better consistency and flavour if you let it melt a bit) before eating. Serve with maple cream and a drizzle of more maple syrup.
The cake will last a week in the fridge or store in the freezer for an extended amount of time.
Maple Coconut Cream
Recipe:
1 can of full fat coconut milk
1 teaspoon maple syrup, plus more for drizzling
Procedure: Place the can of coconut milk in the refrigerator overnight. The next day, scoop the soil, creamy fat from the top of the can, leaving behind the watery portion (save the watery portion for smoothies, baking, or soup) of the milk behind. Beat the cream portion with a electric beater until soft peaks form. Add the teaspoon of maple syrup and beat for another few minutes. The mixture will not get as stiff as cow cream, but it does become a soft, whipped cream consistency.
Thanks Jen! That is so great to hear! Oh, I am so pleased you liked it 🙂 You are so very welcome and thank you so much for you lovely comments and sharing it with others.
I am also so happy that it worked out with the dairy. It sounds really good that way too!
All the best,
Sophie
Thanks Jen! That is so great to hear! Oh, I am so pleased you liked it 🙂 You are so very welcome and thank you so much for you lovely comments and sharing it with others.
I am also so happy that it worked out with the dairy. It sounds really good that way too!
All the best,
Sophie
Update: We LOVED the pie! I did slice it straight from the fridge, but we couldn't wait to eat it after it warmed up on the counter. Still thought it was fantastic straight from the fridge - - loved the flavors and textures! PERFECT anniversary dessert : ) Will have to try it tonight after the slices have warmed up a bit. I've shared this on facebook and with several friends already!! THANK YOU!
Side note: since we are not vegan and I didn't have coconut milk or cocobutter, so I just substituted butter and whipping cream. It works well with this pie. (just in case any other folks reading these reviews are reading).
Thanks again, Sophie!
-Jen
Congratulations on your anniversary! As well as committing yourself to a whole month without sugar (hard to do at times). I am so happy you like the pie so far! One thing I would definitely stress, is to slice the pie when cold, but let the slices warm up before eating them- like maybe for an hour or two on the counter. The flavour is just that much better at room temperature.
I hope you two have a wonderful day tomorrow <3
I just made this for tomorrow, my and my husband's first anniversary. We committed to a "no sugar November" - - no refined sugar until our US Thanksgiving - - and we both have huge sweet tooths. Licked the spatula and it tastes a lot like pumpkin pie filling!! YUM! Can't wait for a slice!
Thank you Aimee. Yeah, you're totally right about the peanuts! I know a few people who are pretty heavy handed when it comes to the PB part of PB & J 🙂
Thanks Maggie. Pecans are one of my favourites too!
This looks soooo good! And I wouldn't worry about the amount of nuts... Just think about how many nuts must go into peanut butter, and people aren't concerned about eating large amounts of peanut butter!
I'm down for anything that has pecan's in it! 🙂
This look delicious!!! 🙂
I'll mail you a piece in your next care package 🙂
Sweater from the WIN, the best place on earth.
Sophie, I wanna eat all of it. Also, nice sweater!