Everything you need to know to make your own bakery-worthy basic sourdough bread at home and my favourite add-ins for flavour boosting. This simple guide will teach you how to make a basic sourdough and help you on your sourdough journey. Here's how to store your sourdough.
I worked as a baker in an artisinal sourdough bakery in Victoria while I was studying for my undergraduate degree, starting all the way back in 2011. So, having good bread literally at my fingertips for so long became second nature.
It wasn't until we moved away to Vancouver that I began to really see that I had taken it for granted. Landing in Vancouver I was shocked to see that good bread really didn't exist in the same way I was used to, and if it did, it cost an arm and a leg. In 2015, out of desperation, I began making my own naturally leavened bread at home and haven't looked back since.
This is an ideal beginner's guide for anyone looking to start making sourdough bread. It's so much easier (and more relaxed) than you think. While I have provided a rough baker's schedule, use is only as a guideline and not hard-and-fast rules. Sourdough bread is so much simpler than many bakers make it out to be!
One reader, Cynthia, commented: "I just wanted to let you know that this is my go to guide for making sourdough and I share this link with everyone I share my starter with. I guarantee you’re responsible for many a happy sourdough lovers, eating some of the best sourdough they’ve ever had. Thank you for your easy, precise and accurate instructions."
Another reader, Amber, said this: "This bread was a hit with my family. I’ve made other sourdough breads and decided to try this one based on the photos and the eclectic factor of using a Dutch oven. It was time to bake bread again yesterday and I asked the kids which kind it would be and they all shouted for the round one! It is currently in the oven."

Jump to:
Why eat Sourdough
Today, most store-bought bread gets a bad rap, and with good reason. They often contain unnecessary sugars like corn syrup, artificial colours, and potassium bromate (which is banned nearly everywhere but the United States). Beyond these, they often contain a number of ingredients you'd never want in your kitchen, let alone your body. Homemade bread (especially sourdough) on the other hand is a different story, and for me, it’s a love affair.
Unlike store bought yeasted bread, which has a rushed prove and is often loaded with a mile-long list of ingredients, homemade basic sourdough is a slow process that involves fermentation and basically just three ingredients: flour, water, and salt. The lengthy preparation time means that the gluten protein is broken down by amino acids, making it more digestible and suitable for those with gluten sensitivity.
It is still not suitable for celiacs. I've shared a gluten-free sourdough bread recipe and gluten-free sourdough starter for those who need it.
While just starting out, getting into bread making can indeed seem like such a daunting endeavour. I’ve decided to break down my "choose your own adventure" method below just to show you how easy making nutritious bread can be.

Basic Equipment
You don't need a lot of equipment to make basic sourdough, but these few items are essential.
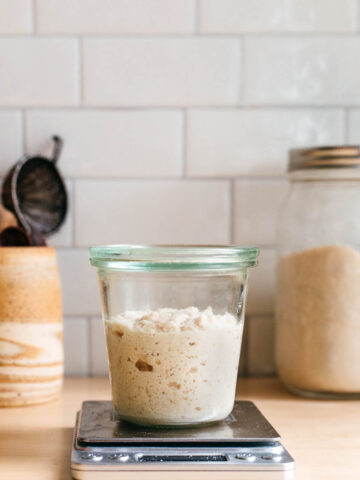
Scale
All bakers will agree that to bake with consistent results you need a scale, and this is never truer that when it comes to bread making. I have an inexpensive digital scale. When looking for a scale try to find ones with proper buttons, as the buttonless (touch screen type) ones often have issues working and zeroing.
Flour
Using the best flour you can get your hands on is key. It’s like that old saying about the quality of your work being as good as your worst ingredient. Look for brands that don't use additives or bleach. Keep it simple with just one ingredient, the grain. Of course, if you can get local, strong bread flour, that is an added plus. I love to use locally ground flour that is stoned milled, like the products from Flourist.
Filtered Water
Anytime you ferment something in a city or urban environment, from pickle making to yoghurt, you'll have to use filtered water. Water additives like chlorine inhibit fermentation, so filtered is best in terms of reliability. That being said, I've used city water and I still ended up with a tasty loaf of bread.
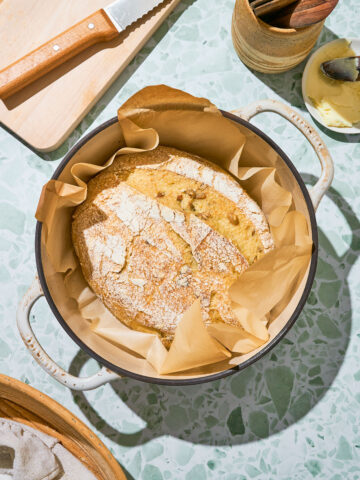
Dutch Oven
Since we're not all rocking the wood fire oven in the back yard, a dutch oven is the next best vessel to bake in. I often use a Staub pot, but any heavy pot will work, just make sure it doesn't have a plastic handle like some le Creuset do.
Blade
To score your bread, you'll need a lame, or a razor blade (I stole some from Adam's shaving kit), but a good sharp knife (that is not serrated) will also do.

How to Create and Maintain a Starter
Creating a Starter
You can make your own sourdough starter, or if you're like me and put off by all this work, you can simply get some from an established batch. Lots of the bakeries sell a coffee cup worth of starter for a couple of dollars, so don't be afraid to ask your local bakery. Another option is asking around in your friend groups or online. People won't mind sharing a tablespoon. Finally, if you find a group of avid bakers in your city, they will be thrilled to share, so check online for Facebook groups and express your interest.
Feeding Your Starter
The idea of feeding a starter can be daunting! And my forgetfulness/laziness about remembering to feed things dissuaded me from making one for years. Truth be told, starters are resilient. Sometimes I feed mine weekly and sometimes a month or more will go by and I'll forget to feed it, but it always works out in the end. This is not ideal care, but it's good to know if you forget about it for a while, it can be revived.
To care for a starter, keep in in the fridge unless you're using it daily. Otherwise, the night before you want to make bread, take about 2 tablespoons from your refrigerated starter and place it in a bowl or jar. Feed this starter an equal ratio of flour and water and stir well (if you're making 1 loaf below you'll need 100 grams of this mixture, so you'll want to make a little extra to keep your starter going. I recommend feeding it 75 grams flour and 75 grams room temperature water).
Cover this mixture with a plate or lid and let ferment overnight. The next day go on with making your bread, returning any extra fresh starter to the fridge. On weeks when you don't make bread, follow this same method but use less flour and water (say 50 grams of each).
If you get a starter and want to change it over to a different type of flour (say rye), you can feed your starter in the method stated above, but instead of returning it to the fridge, keep it on the counter feeding it every 12 or so hours. After a couple of feeds, your starter will consist of nearly all the intended flour.
Common Starter Questions
Why is there liquid on my starter?
Sometimes you'll get a layer of greyish liquid on top of your starter. This is called hooch. It occurs when the starter isn't fed enough (like when I forget to feed it for months on end) and it's basically going hungry. If there is lots of this liquid on top you can pour it off, but I often just stir it into the next feeding, no problem.
Why does it smell like apricots or alcohol?
This is again a sign that your starter is hungry. It is consuming itself and you’ll need to feed more often. If this happens, feed your starter as you normally would and continue using it.
What do I do if there is mould?
I've never seen this happen, and it will only happen if you use an unsanitary jar. If you do see mould you can treat it one of two ways. If there is a little mould on the top, remove it with a clean spoon. Take a little bit of the starter and feed it. Continue feeding it for a couple of days to ensure there is no mould growth, then return the starter to the fridge until you need to use it. If the mould is beyond just the surface area, your starter is garbage and you'll need to start over.
What happens if it gets too hot?
I've seed this happen to a couple of friends who have left their starter in the oven (to keep it slightly warmer) and accidentally turned it on. In cases like this, your starter is cooked and you'll most likely need to start fresh.
How to Make a Basic Sourdough Schedule
You'll want to start your basic sourdough two days in advance. 99.9 % of this time is inactive waiting, with only about 40 minutes of total work. This is an approximate schedule for how I make sourdough bread.
- Step 1: 9:00 p.m. Friday - Make leaven
- Step 2: 10:00 a.m. Saturday - Make bread dough
- Step 3: 10:30 a.m. Saturday - First fold
- Step 4: 2:00 p.m. Saturday - Place dough in the fridge
- Step 5: 8:00 a.m. Sunday - Bake
Visual Guide

Step 1: this is the leaven after rising overnight. You can see how bubbly and active it is.
Step 2: mix the leaven with the water, checking that it floats.
Step 3: mix the dry ingredients into the water mixture.
Step 4: shape into a rough ball.

Step 5: do your stretches and folds. The dough should look quite smooth and be elastic when they're completed.
Step 6: shape the dough into a boule (a ball with surface tension) and set aside to prove.
Step 7: turn the dough out and score.
Step 8: bake as instructed, until nice and golden.
Add-in Options
You can add nearly anything to your basic loaf to make it something special or go with any meal. You'll have to play around with the amounts to suit your preference. I've shared several flavoured sourdough recipes over on my other site, Baked Collective, so you can check those for references to amounts.
Spices: cumin, fennel, cinnamon (causes slower rise), dried herbs, turmeric, ground cardamom, and anise are great ones to start with. See cinnamon raisin sourdough bread.
Fruits and Veggies: try cooked beets and another root vegetables like purple sweet potato or mashed pumpkin. Dried apricots, dried cranberries, raisins, dates, candied lemon or orange peel add a sweet touch. Soak your dried fruit in boiling water for 30 minutes. Drain and chop before adding to the bread. See cranberry sourdough bread.
Fancy: chopped fresh garlic, pitted olives, cheese, lavender, or sun-dried tomatoes. See sourdough olive bread and jalapeño cheddar sourdough.
Seeds and Nuts: toasted nuts like walnuts, pecans, or seeds like sesame seeds, pumpkin seeds, sunflower seeds are all amazing.
Grains: cooked and cooled polenta, cooked oatmeal or millet porridge, and sprouted grains bring a new texture to loaves. See sprouted grain sourdough.
My Favourite Flavours
Seedy Loaf: I use 100% sifted spring wheat and mix in ¼ cup toasted sesame seeds, 2 teaspoons crushed fennel seed, and 1 tablespoon poppy seeds after the autolyse. Before retarding the dough, I sprinkle some more seeds and some coarse salt on top.
Turmeric and Leek: This loaf is 100% sifted spelt. After the autolyse I add one cooled sautéed leek, a teaspoon of turmeric, and a pinch of black pepper.
Walnut Rosemary: For a slightly lighter loaf, I mixed 200 grams of whole red fife flour with 300 grams of sifted red fife flour. I also toss in about 100 grams toasted walnuts (chopped) and 2 tablespoons chopped fresh rosemary after the autolyse.
Fig and Cinnamon: Made with 300 grams whole grain red fife, 200 grams sifted spring flour, then 200 grams soaked, drained, and chopped dried figs, 1 heaping teaspoon cinnamon after the autolyse. Note that cinnamon will delay the rise time.


If you make this Easy Sourdough Bread or any other whole food bread recipes on Wholehearted Eats, please take a moment to rate the recipe and leave a comment below. It’s such a help to others who want to try the recipe. For more WHE, follow along on Instagram or subscribe for new posts via email.
Recipe
Basic Sourdough Bread
Equipment
- Measuring cups and spoons
- Mixing bowl
- Plate
- Parchment paper
- Banneton
- Dutch oven
- Bench scraper optional, but helpful
Ingredients
- 100 grams leaven made the night before, see instructions
- 375 grams water room temperature
- 500 grams flour I like 50% sifted and 50% whole grain, but use any ratio
- 10 grams sea salt
Instructions
Two Night Before: Make the Leavan
- Two nights before you want bread, you’ll need to make the leaven (a word from French to “give rise”). This is usually the last thing I do before I go to bed. Take out about 1-2 tablespoon of your starter from the fridge and mix it with 50 grams of room temperature water and 50 grams of flour (sifted, whole grain, spelt, or a combo, whatever you prefer as long as the flour to water ration is 1:1).
- Cover the bowl with a plate and leave it on the counter to ferment overnight (a minimum of 8-12 hours). The next morning you know you can begin making bread if you pinch a little bit of the leaven off and it can float on the water’s surface (this means it’s full of fermented gas). If the ball of dough sinks, let the leaven sit out a little longer to ferment. If you can’t get to making bread until later in the evening, that shouldn’t be too big of a problem. See how to make sourdough levain (leaven).
Morning Before: Mix + Autolyse
- Once your leaven is ready you can get started on the bread. Combine 100 grams of the leaven with 350 grams of water. The remaining leaven can go in the fridge as the base for your next loaf, keeping the starter alive. Add the flour to the water mixture and using your hands mix to combine.
- Once mixed, cover with a tea towel and let sit anywhere from 30 minutes to 1 hour. This gives the flour time to absorb the water and is called an ‘autolyse”. After the bread has had time to rest, add the remaining 25 grams of water and the salt. Mix well until combined. If you want to add flavours or seeds to your bread, now is the time.
Stretches and Folds
- After you’ve mixed in the salt you can do your first fold. To do this begin by getting your hands damp (it’s less sticky that way) and reach under the dough on the opposite side of the bowl from you. Pull the dough up and over towards you.
- Repeat this so the side closest to you folds over to the side away from you and the side on your left folds towards you right, and your right folds towards your left. Think of it as wrapping a package.
- Next, scoop your hands under the ball of dough and flip it over completely. This completes one “fold”. You will do one of these complete “folds” every 30 minutes for 3 hours (perfect reading or Netflix time!) for a total of 6 times. I like to write down each fold I do just to make sure I haven’t lost count. After the 6th and last fold, let the bread sit for a final 20-30 minutes. See how to stretch and fold sourdough.
Shaping
- To begin to shape your dough, gently scoop it out of the bowl, and using lightly floured hands (or a bench scraper) form into a rough ball. Let this dough rest on the counter for another 20 or so minutes before the final shape. In the meantime, get your banneton dusted with flour, or if you prefer, layer a clean tea towel in a medium mixing bowl and dust the cloth liberally with flour.
- To finish shaping, flour the surface with just a touch of flour. Too much flour will prevent the dough from sticking to the surface and getting taunt. Turn your bread over onto the counter and gently fold it up like a burrito, then flip it over so that it’s seam side down and use your hands to cup and roll the dough.
- You want to make as much surface tension as possible without tearing the outside of the loaf. Once shaped, turn the loaf into the lined and floured bowl (top-down). Gently flour the top of the loaf (which is, in fact, the bottom) before covering with the edges of the towel. See this full post on how to shape sourdough boules.
Proofing
- Pop this loaf in the fridge overnight for a next day’s bake. You can keep a loaf in the fridge for two days, but I do think it is better after just one day of fermenting. If you don’t want to retard your loaf to bake it later, let it rise on the counter (in the prepared bowl) for 3-4 hours.
Preheating
- The next day, take one of the racks out of your oven to create space. Place your dutch oven in the oven and preheat the oven to 260°C (500°F) (or as hot as your oven can go, up to 500°F). After the oven has come to temperature, let it heat for another 30 minutes to get the dutch oven fully heated.
Scoring
- After the 30 minutes is up, take your bread out of the fridge. Gently invert the dough onto a piece of parchment paper that will be large enough to lift your bread into the dutch oven. With your lame or knife, gently score bread. This allows the loaf to expand and prevents any bulges.
Baking
- Working fast, take your dutch oven out of the oven carefully. Remove the lid and gently lift the parchment and bread into the pot, being super careful not to touch the sides. Cover the pot with the lid (be careful, it’s hot!) and put the entire dutch oven back into the oven. Turn down the heat to 230°C ( 450°F ) and bake for 20 minutes.
- After the 20 minutes are up, gently take the lid off of the dutch oven (be careful of steam) and bake for another 20- 25 minutes (I like mine a little darker, personally).
- Once cooked, remove the pot from the oven and gently lift out the loaf by lifting the parchment paper. If that’s too hard, just let the loaf cool in the pot.


I decided to try this recipe today and so far up until I placed it in the fridge the dough was super to work with...I was attempting to skip the retard but was wondering abt the scoring..
Is it possible to do some intricate scoring on the dough when you have skipped the fridge retard...This info will be most appreciated.
Thank you
Indi
Hey Indira, if you proof on the counter, you can defiantly still score it. Just make sure you make nice clean cuts and use a sharp lame 🙂
Hi Sofie, thank you for your quick response..This bread was really lovely to work with, however now that I've baked it...once cooled and sliced it is a little gummy...any reason that might be..I followed the recipe to a T, however is it possible that I did
50 starter, 100 fl, 50 water, I was making a levain for a brioche and decided to use it for this bread too...would that result in the gummyness or was it that 230° C was too high.. My kitchen is quite warm so not sure how to adjust ...
Still it is delicious so thank you.
I will be trying this again.
Indira
Hi Indira, everyone's oven is different——as are our baking conditions and the flour we have access to. I am baking at nearly sea level, so if you are baking at a higher elevation, or with an electric oven versus a gas, etc, it might be a little off. If your bread was totally cool and had time to cure (you always want to cut into sourdough after it has rested for a few hours) it could be done to just needed to bake it for a few more minutes next time. 🙂
Hi Sophie, yes you are Right. Once the dough was cooled completely and rested, the texture though a little sticky as opposed to gummy made me realised that I should have lowered the heat and cooked a bit longer...This bread though was really awesome.great ovenspring easy to work with and And to think I used AP flour and an old pot for a dutch oven..
.thank you sophie.
Indi
So much great information here ,ThankYou. I am about ready to make my first starter. I have a question…can I bake the sourdough bread in a steam , steam-combi oven ? Tim’s is a new oven and I am looking for some guidance.
Thank you , I look forward to you answer.
Hi Janet, I have only ever baked with a steam oven commercially but I would recommend not using a dutch oven, but a baking stone instead. Give the bread some steam when you put the loaf in then let it bake for 15-20 minutes before venting any remaining steam out. I hope that helps.
Hi Sophie!
I just wanted to let you know that this is my go to guide for making sourdough and I share this link with everyone I share my starter with. I guarantee you’re responsible for many a happy sourdough lovers, eating some of the best sourdough they’ve ever had. Thank you for your easy, precise and accurate instructions.
Sourdough loving,
Cynthia
Just started the sourdough journey and this turned out perfect!! The timeline you provided was very helpful. It was so good I want to make more. Is this a recipe I can double and split into two loaves when shaping?
So happy you're enjoying the recipe, Amy! Yes you can double the recipe and spilt it before shaping, no problem 🙂
Hello - not sure what I am doing wrong but i mixed 100 g of the flour starter with 350g of water and have a soup that looks nothing like the picture.
Finally, I decided to explore natural fermentation and found this blog. I followed all the steps, and it was one of the best things I did for me in months. Excited about the next steps in this journey, but for sure, I will repeat many times this beautiful and clear recipe.
Hey!
This recipe looks awesome and I am trying to follow it to a T. But, after the autolyse, my dough was super wet. I still added a bit more water, the salt and the seeds you suggested and mixed. After mixing it was still extremely wet and I couldn't do a proper fold, but I tried my best.
Do you have any ideas why it's so wet? Could I have let the starter over ferment? Did I not mix enough?
Any advice is much appreciated!
Thanks,
Tessa
Hello Tessa, that is a bit of a quandary to me. Is it too wet to handle, like soupy? In the past this has happened to me with other recipes and it is usually an issue with me miss-weighing ingredients. Under mixing or over fermented starter shouldn't affect the dough like this. If I had to guess not enough flour was added. If this happens again in the future you can always add a little more flour until you have a dough you can handle. It is a bit of guessing work but sometimes can help save a loaf 🙂
Yes this is also my issue. 100g of starter and 350 g of water = soup!
Omg! Just love this recipe, step by step and clear. Please please write one for your 100% rye sourdough.
Beautiful looking bread, clear and well organised recipe, I couldn't ask for more. Thank you very much, your advices and guidance will definitely make my bread tastier.
thank you so much! I hope you enjoy it 🙂
Hi Sophie! I’m so excited to try this! I want to know exactly what flours on Flourist would you recommend. You said 50% sifted and 50% whole grain but specifically which ones? I was going to buy Sifted Red Spring Wheat Flour & Whole Grain Red Spring Wheat Flour would that work! Let me know please! Thanks in advance 😘
Hi, so happy you found the recipe. Either spelt, red fife, or spring will work! I love all of Flourist's flours and they'll all make a beautiful loaf. I just made one the other day using this recipe with 100% whole spelt. I ended up using a touch more water, but it turns out perfectly.
Hi Sophie,
When doing the folds of my dough it doesn't keep its shape. Instead it fills out the bowl and spreads out! I know there are lots of variables as to why this could be, but wanted to know if you had any ideas? I used Flourists Sifted Red Spring Wheat for the recipe. Thanks (:
Hi Sophie, I have been practicing making sourdough for 2 months now and the hurdle I keep failing at is the shaping. The dough is just too sticky to handle I have used flour, water on my hands, used the dough cutter. I just can’t get the tension in the dough. So when I bake it it’s denser than it should be. I have looked at loads of you tube videos but my dough just doesn’t seem to have the same consistency as those on the video. What am I doing wrong?
such a late comment, but if adding veggies like mashed sweet potato, how much do you add? how does it affect the final texture of the loaf?
You don't have a gluten free version?
Sophie, do you ever bake sourdough using rye flour? Any tips? Would you recommend a mix of wheat and rye?
Thanks!
Hey Amy! I do make rye sourdough. The type I typically make is 100% rye with lots of seeds and cracked rye. Because it doesn't have the same gluten as the wheat, I don't bother stretching it like I do the wheat version. Instead, I make a runnier dough and let it sit out overnight. I then shape it in loaf pans and let it rise a little longer before baking. At an old bakery I used to work at, they would make a rye wheat combo (60% wheat, snd 40% rye), and that could be a better place to begin if you're use to the method I talk about in the post.
Thanks Sophie!
Hi Sophie, pleasure to meet you at the GRAIN pop up shop. Your sourdough was a hit in French toast recipe. Your starter has resulted in an amazing loaf of sourdough bread! Thanks so much!
I have already referred people to your site!!
I can tell this is one of those recipes/posts that I am going to bookmark and refer back to again and again. It's amazing, Sophie! Thank you so much for putting this together. I still want to hang out and bake bread sometime haha! I feel like we've been saying that forever but I want to make it happen. Gonna send you a message soon <3
This bread was a hit with my family. I’ve made other sourdough breads and decided to try this one based on the photos ❤️ and the eclectic factor of using a Dutch oven. It was time to bake bread again yesterday and I asked the kids which kind it would be and they all shouted for the round one! It is currently in the oven.
Where did you buy your bread knife? My serrated knife may be dull but it is a lot of work cutting such a large diameter slice of bread. Your knife looks up to the task.
Do you make other bakery items with your starter?
Hey Amber! I'm so happy to hear this. And I love to hear that the kids are just as excited about the bread as I am. My bread knife is an Opinel and we LOVE it! When I have lots of extra starter, I try to make pancakes, waffles, and crackers with it. Also, when I'm feeling fancy, I love making a version of these cinny buns <3
Super Gorgeous! I've been working on a GF sourdough for the last few weeks. It's been getting better, but I'd love to hear about how the method you use differs.
Thank you so much, Rebecca! That's awesome you've gotten into sourdough. My g/f sourdough isn't that much different, just a lot less work, lol. I don't do any of the folds because there is no gluten, but I still do the overnight proof. I'll hopeful get a post up soon if you're keen. xox Let me know if you have any questions.
I’ve never made homemade bread before (!) but now that I can tolerate small amounts of gluten again I am alllll over this. Love these photos so much, Sophie!
Ah, I think you'd be SO good at making bread! I can't wait to see what wicked creations you'll come up with. Thank you so much, Ashlae <3
Love this! Sourdough bread is such a unique and gorgeous flavour, but takes some practice to get right. The fact that a basic loaf is made of such simple ingredients makes it versatile and able to pair with so many dishes and other flavours. Thanks for sharing this!
I'm thrilled to hear you like the post, Mary! It's truly magically that something so delicious can be made with so few ingredients. XOX
Thank you for sharing this! I had a starter going for over 2 years before my family made a move and I've been wanting to get back into sourdough. This post was such a great inspiration!
So happy to hear so, Tori! I can wait to see what wonderful creations you come up with!
Sophie! Thank you for this wonderful tutorial! Your love affair translates so wonderfully in your photos and in your written words. This is so inspiring, thank you so much! Your Favourites all sound delectable. xoxx
Aw, thanks Shira! We seriously love our bread around here <3 I can't wait to start working on some more winter flavours....cardamon and cranberry he we come 😉
Sophie, this post (and beautiful pictures!) makes me want to take my sourdough bread baking to the next level. <3 And I'd really love to try baking in some root vegetables or dried fruits. So far I've tried dried tomatoes and it came out very delicious!
Hey Laine! Thank you so much! The sound of dried tomatoes is literally making my mouth water! I recently made a roasted butternut squash, sage, and black pepper loaf - soooo good with soup <3
What size is your dutch oven? I'm going to purchase one for this purpose - Would 4/5/6 qt work best? Thank you!
We have a 6 qt, but I feel we could even go bigger sometimes.
What a clear and beautifully written post, Sophie! I started making sourdough using Tartine's method a couple years ago, but feel I still need more practice to perfect my loaves. You've done such a wonderful job keeping the directions clear, simple, and un-intimidating. The lovely photos help to inspire as well. Love the flavor combos too!
You're too kind, Emily! Thank you ever so much 🙂 The Tartine recipe is a great one for sure. And I bet your bread looks awesome. I'd love to see pics of it!
I was so excited to wake up and read this post (!!) and it blew me away!! I'm sitting here with my cup of coffee in awe of the beauty you have captured of the process and of each variety! Sophie, seriously words cannot do this justice! You have shared such a user-friendly guide and it is written in such a readable voice. I've tried making a starter a couple time before but have only ever managed to kill it... I think I need to contact my local bakery because all I want to do now is bake bread. 100x over, thank you! xx Jess
Aw, that makes me so happy to hear, Jessica! A million thanks to you <3 I know you can keep that starter alive. You got this! Can't wait to see what creations you come up with xox
What beautiful bread! I feel so inspired to give making sourdough another go - I made it years ago, but then fell out of the habit. Thanks for the inspiration to try again xx
Yay! That makes me so happy to hear, Amber! It's an easy thing to fall out of the habit of making, but now is the perfect time of yet to get back on it. I can't wait to see what you come up with!
That is one GORGEOUS loaf!!!
Thank you so much, Rachel! <3